Friday, May 25, 2012

Week 5 - iphone slipcover

Hi! This week's project was interesting...but fun. I just recently got an iphone, yay! The "case" I wanted for my phone isn't really a case, it's more like a protective sticker. Although the sticker keeps the phone from getting scratched it wouldn't protect it from dropping or any other accident that an actual case could protect it from. My husband gave me the idea of sewing a soft protective case for it. So that's how this project came about.


What I learned most from this project is that when you are creating something from scratch, make sure you think through all the steps and MAKE A PLAN/PATTERN. That may sound simple but it's true. I modeled this project after the laptop slipcover I made a couple weeks ago. All in all it's very much the same, just on a smaller scale. Halfway through sewing I completely blanked and couldn't remember what all the steps were from the laptop version. I was trying to do it from memory and for some reason couldn't bring myself to just open up my laptop and re-read the tutorial. So, long story short, I finished it and it turned out just fine. It's not perfect but it works!


 First I decided on the material and gathered all my supplies. Disregard the buttons, I decided adding buttons would make it too big and bulky.


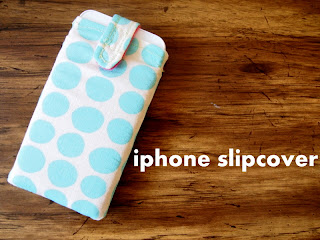
This is my super awesome iphone "skin" by the way. I LOVE it!


Once I picked out the material, (cotton for the outside and fleece on the inside) I measured the phone and added a half inch on all sides. I thought that would be enough of a seam allowance, but it ended up being super tight on the phone. After sewing the panels together I ironed them and trimmed all the excess fabric and even then it was tight. It ended up being okay though, it is a nice secure fit around the phone, I would have liked it to be just a tad looser though. 
 

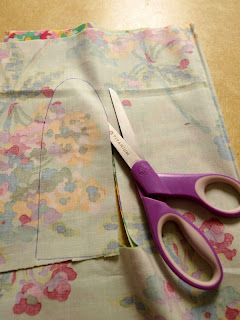
Cut out the panels. Two from each fabric.


 Freehand the strap. Cut out one from each fabric.


 Here are the two panels from both fabrics and the strap all cut out.


 Place the strap fabric, (cotton and fleece) right sides together and sew as close to the edge as possible.
Turn it inside out and top stitch along the edge.


Now, this is where I got a little lost. If you are planning on sewing a case like this, just refer back to the laptop slipcover tutorial for the next few steps. I was again so focused on what I was doing that I forgot to take photos. Sorry! 

I ended up doing this the hard way. So if you are making one of these either follow the other tutorial or make it up as you go to try to find an easier way. 

Anyway, after you sew the two inside and outside panels together, secure the strap between the lining and outside, and sew on the velcro you are pretty much done! And it should look something like the photo above. Sounds so easy doesn't it! Ha! Well, it really is easy it's just that when sewing a smaller item like this it can get frustrating trying to fit it just right under the needle so that it goes through...it's hard to explain.


 This project is not perfect. It's not one I'm super proud of, but it was a learning experience and that's what this blog is all about.

Enjoy!
Saturday, May 19, 2012

Sewing Blog?

Hello! So today I'll be writing about something a little, (okay, a LOT) different than normal. It might not be the last time I stray away from posting about sewing because cooking/baking is such a huge part of me and how I express my creative side. So here it is, my non-sewing, sewing blog. Ha!

Last weekend was my birthday. I love birthdays. Over the past few years it has become a kind of tradition for me to make my own birthday cake. The first year, (I think it was my 14th or 15th birthday) I made my first Red Velvet Cake. When one of my older friends found out I had made it she got playfully mad at me and told me I shouldn't make my own cakes, and that it was a time for me to be served by others. What she didn't know was that making my own cake was the best gift I could ask for. I genuinely love to cook, doing things like this makes me happy and calm. When I'm in the kitchen, (or sewing room) creating something, I come alive. 

So there's the back story, on to the post. 

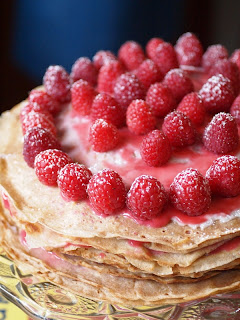
As I said, last weekend was my birthday. I made my first ever Crepe Cake! It definitely won't be the last!

It all started when I saw a photo on Pintrest of a three layered crepe wedding cake. I had never seen or heard of a cake made entirely out of crepes before and I fell in love! I searched for images of more crepe cakes and saw a very cute/delicate one layer crepe cake with raspberries on top, adorable! Then ideas started flooding into my mind. "Yum! Raspberries on top, that's super cute...you know, raspberries go great with white chocolate...but why not stop the raspberry flavor with just the berries on top?...I could layer white chocolate and raspberry sauce between the layers!" A revelation! 

White Chocolate Raspberry Crepe Cake


I used 3 different recipes to create this cake so here are the links:

Raspberry Sauce:

I followed this recipe pretty closely. The only thing I did differently was I added about twice as much orange juice because I love the flavor it adds to the raspberries.

White Chocolate Icing:

Now, for this recipe I ended up adding probably triple the amount of powdered sugar. The consistency just wasn't quite right. I added a splash of vanilla extract as well. Yum! Also, I found that there was way too much butter/oil in this recipe. I made both the raspberry sauce and the icing the day before I assembled the cake and put them in the fridge overnight, the next day I opened the fridge to find a layer of oil sitting on top of the now nearly rock solid icing! Gross! I drained the oil off of the top and put the huge chunk of icing back on the double boiler and melted it all over again. Then I put it back in the mixer and added even more powdered sugar until the consistency was just right. in the end it tasted amazing, just took a little tweaking to get it right.

Basic Dessert Crepes: (from the Better Homes and Gardens, Crepe Cookbook from 1976)

1 cup flour
1 1/2 cups milk 
2 eggs
2 tbs sugar
1 tbs cooking oil
1/8 tsp salt
(I also added a couple dashes of cinnamon, because it's my favorite.)

Mix the dry then wet mix together until well combined. The recipe says it makes 16 - 18, 6 inch crepes, I made mine 12 inch so I tripled this recipe. Ended up with 20, 12 inch crepes.

If you've never made crepes before it can be a little tricky the first time. I had made them once before but not on this mass scale! And it had been quite a while since I last made them so I was pretty much starting from scratch. I'm sure there are great tutorials online on how to make them so I won't try and explain. All I'll say is that the trick for me, (because I was using a regular skillet, not a special crepe pan) was getting the heat of the pan just right and timing exactly how long it took to brown nicely on both sides. After I figured those things out I had it down to a science! I stood over the stove for about 1 1/2 hours but it is really fun once you get the hang of it!

Assembly: I made all three components of this cake the evening before, (icing, sauce, crepes) so that it would be somewhat fresh the day of. It worked out quite nicely, (except for the icing which was easily fixed).


First I laid one crepe on my cake platter, spread a thin layer of icing over it and then spread on the raspberry sauce "spaghetti sauce" fashion on top of the icing. Topped it with the second crepe and so on a so forth. 20 crepes later, I was finished! Last layer of icing and sauce on the top then arranged fresh raspberries on top, dusted with powdered sugar and voila! C'est fini!


This was the most fun cake I have ever made and it tasted AMAZING! I hope you enjoy it as much as my family and I did!

Friday, May 11, 2012

Week 3 - Mother's Day!

Hello Everyone! Well, today will be a short post. My birthday is this weekend as well as Mother's Day and there is so much to do! I've been searching around the internet for inspiration for Mother's Day gifts and finally I found something that sparked my creativity. I decided to make this cute little drawstring gift bags and fill them with organic loose leaf tea for my mom! I think she'll love it! 


I didn't really learn much from this project, except maybe how wonderful my husband is! I couldn't get the drawstring fed through the hole in the first one I sewed and I was getting frustrated so my hero stepped in and took over. 20 minutes later he got it through! HA! He is just great. (So I guess the moral of the story is to make your drawstring hols big enough for the ribbon you are using!)

Note: I decided to hand stitch the first bag I did, then because it was taking too long I stitched the second with my machine. It was definitely easier to sew with the machine so it's your call as to which method you use, but all the photos are of my hand stitching.


 This project was VERY simple. First gather your supplies.


Measure the item(s) you want to put inside the bag, (or just make it as big as you want).


 Fold a piece of fabric in half right sides together and cut out the shape you want. Then sew up the sides. (no photo for this).


 Fold down a flap at the top of the bag, Sew along the bottom of the flap to form the drawstring hole.


 Turn the bag right-side out, feed the string through and voila you are done!


Then, because these are a gift I added little gift tags to each bag specifying which tea is in which bag.


Enjoy! And Happy Mother's Day!


Friday, May 4, 2012

Week Two!

Well Hello! I've had a very busy week and so I'm just now getting to post this week's project. Yesterday I made a Lap-Top Slipcover! I originally found a tutorial for this on Pintrest and couldn't wait to make one! I'm not going to pretend like I know more about sewing than the women who wrote this tutorial, so I'll just write about my experience sewing this project and the few slight changes I made. 


I had a lot of fun sewing this! My machine didn't act up at all during sewing so that made it a whole lot more enjoyable! This is a great project! 

What I learned through this project...hmm, she made the tutorial so easy to follow and it was pretty basic to sew. Before I stared sewing I cleaned out my machine casing because the top thread kept getting caught in the bobbin bellow, so I guess I learned the importance of keeping a clean machine! 

Alright, so following the tutorial I started by gathering all the materials.


First I measured my laptop and figured the dimensions for the panels. Then I cut out 2 panels from the cotton (exterior) and 2 from the fleece (lining).

 
 Next I had to draw a template for the straps. I am NOT an artist when it comes to drawing so I had to mess with this a little bit to get it right, and even then it wasn't perfect...oh well. Then I cut out the straps. Again, 2 from each fabric.


 Here they are all cut out and put together. (I know I've got ugly counter tops!)


Then I sewed them together. Going around the curve was a little hard, but I figured it out and got better by the time it came to top stitch them. By the way, I figured out that it's easier to sew when the cotton is facing down, otherwise the fleece doesn't move along and could get caught in the teeth. (Even with the feeding teeth on the lowest setting.)


Here they are both stitched.


After they are both stitched, turn them inside out and iron them flat.


Then it's time to top stitch around the outside to make it look really cute!


Here they are both top stitched and ready to be set aside for later. (Yeah, I don't know why the one on the right has that funny little bump on it...that's what I love about homemade things though, they have personality!)


Now, I don't have a buttonhole maker so I skipped that whole section in the tutorial, I'll show you what I did instead later on.

Next I pinned the 2 cotton panels right sides together and sewed along the 2 long sides and one short side. 


Then I sewed the straps onto one side of the opening on the cotton fabric like this.


Then I was ready to sew the fleece lining together. Like she explains in the tutorial, I sewed up the 2 long sides and about 2/3rds of one of the short sides leaving an opening in the middle as you can see in the photos bellow.


The next steps were a little complicated and I was so focused on doing it right that I didn't get any photos! I did it just like she does in the tutorial. So refer back to it for these steps. So it ends up looking like this.


Then I hand stitched the hole in the bottom of the fleece together to close it up.


Then feed the lining back into the exterior and work the corners together. Then it looked like this and was nearly done!


Next you top stitch around the outside of the opening like this. I love the way it looks with the top stitching!


Now for what I did differently because I don't have a button hole maker. Easy, just little velcro tabs sewed where the button would be. I started hand sewing the velcro on but it wasn't holding strong enough, so I decided to machine stitch it on. Now it holds great! 


Then I hand stitched the buttons to the front of the tabs just for decoration, and to hide the velcro stitches. Then it was finally done! 


Last week's project took me a full 10 minutes to complete. This week however took me about 4 1/2 hours from start to finish! Ha! It was still a simple project though, and I had a ton of fun making it! I hope you do too!

See you next week!  

Enjoy!