Wednesday, July 11, 2012

Week 9 - Diaper Clutch

Well hello! Yes, I'm still alive. So much has happened over the past few weeks. My husband and I traveled to Indiana, Illinois, back to Indiana, Ohio, Kentucky, Tennessee, back to Kentucky, Indiana again and finally home to Illinois! Whew!

But, I'm back now and I finally have time to sew again! 

So this weeks project is another gift for my friend who had a baby recently. I originally wanted to make a whole diaper bag but because I've been gone so much and will be leaving again soon I didn't have time! I decided to make something a little smaller. After some pintrest surfing I found the perfect little gift! A diaper clutch. I found the tutorial for this on this blog . I followed it pretty closely, the only thing i did differently was I made a elastic strap instead of the cotton webbing strap in the tutorial. So if my post isn't clear enough you can refer back to the original tutorial. 

What I learned from this project: I learned how to "box corners"! Yay! I have always thought that making those cute little corners required a special skill but in reality, they are super easy! When she said to pinch the corners and sew I was confused and didn't know why she was telling me to do that. After I did I realized that I had just boxed the corners! Super cute and easy! I was excited.


This project is made from both linen and cotton fabrics. I love linen, it give such a sweet texture to whatever you are making.

I love the cute ladybug fabric I used for this. It was a fat quarter I had picked up a while back thinking it was cute but didn't have a project in mind. Perfect! And the purple linen I used was a yard sale find! Score!

Okay so first gather all the supplies. Fabric (linen and cotton), fusible fleece, velcro, and elastic (or whatever you want your strap made of). 


 Using the original blog post for reference, cut the fabric.  


 Pin and sew together your outside panels like so. (Above and below)


Then it should look like this.


 Iron your panels flat and fuse the fleece to the back side of each of them.


 Now sew on the fuzzy side of the velcro to the panel you want to be the front of the pouch.


Pin and sew the 2 panels together to make the exterior of the pouch. Pin the panels together right sides facing and sew the 2 sides and bottom leaving the top open.


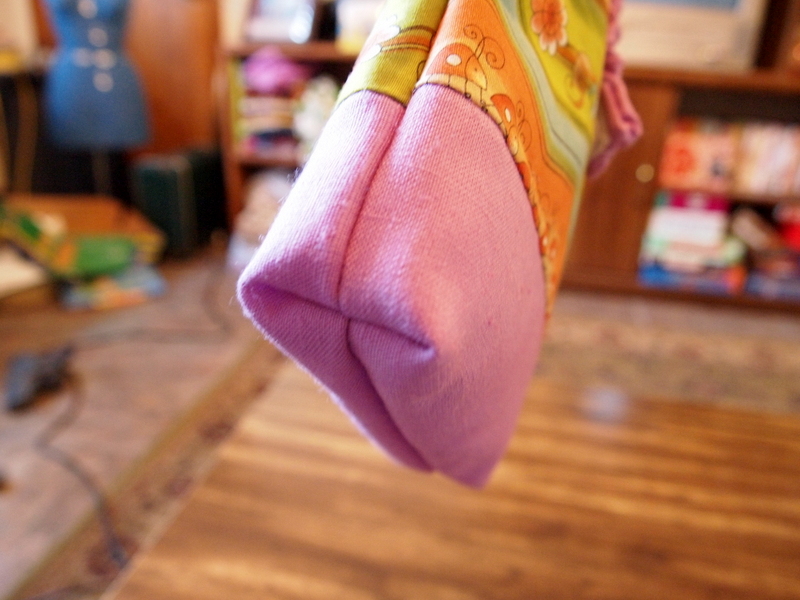
Now you get to box the corners! Simply pinch the corners, and sew about an inch below the corner. Do this with both corners and it should look something like this. Then clip the corners like they are in the below photo. Turn right side out and set aside for later.


Now it's time to sew the interior of the pouch. Pin and sew the 2 panels of linen together along the 2 long sides, when you get to the bottom leave about  a 3 inch gap in the middle. This is to turn it right side out later. Leave the top open like the exterior.


The 3 inch gap.


 Box the corners just like before!


I had the idea to make a cute scrunchy strap out of elastic. So I measured about 8 inches of elastic and about 10 inches of linen to cover it when stretched out. Lay out as seen in the photo. This part was a little tricky but turned out cute. Stretch the elastic with both hands while folding the fabric over it and sewing at the same time...this is easier said than done.


It ended up looking like this. Not perfect but still cute!


 Grab the exterior that you had set aside for later, it's later! Stitch the strap to the middle of the backside. (See photo.)


Now slip the exterior inside the interior with the right sides facing, (exterior should be right side out and the interior should be wrong side out.) and sew along the top stitching the exterior and interior together.


 See!


Now feed the exterior through the gap you left in the bottom of the interior to turn them right sides out! Refer to the photos below.


Once you have them turned right sides out you can sew up the gap in the bottom of the interior and stuff it inside the exterior.


 Then top stitch around the exterior to secure the inside to the outside.


Sew on the velcro to the strap and you're done!


 Aren't those boxed corners just so cute!


Enjoy!


Thursday, June 14, 2012

Week 8 - No-Sew Baby Blanket

Okay, so these next two weeks are going to be extremely busy for me.
Today's post is a quick and easy one. The next few weeks will be similar, simple and quick.

This week I made a super cute baby blanket for a friend of mine who is having a baby next month! These types of blankets are very easy and fun to make. I've made these as bigger blankets for adults as gifts many times before.

I know this is a no-sew project, so it doesn't really teach anything about sewing. Still fun though!


I originally got the idea to make this specific blanket when I was digging through a bin at Goodwill! I found this piece of fleece with the adorable world map design. The new parents that I made this blanket for are like my husband and I in the way that we both love anything with an international theme! I immediately thought of them and their coming baby. The perfect gift for them!  


First, gather all the supplies. The blanket I found at Goodwill was one of those free gifts for donating to an organization and it already had finished ends, I imagine that originally the fabric was a whole yard, with the finished ends though, it was just under one yard. So unless you find this same fabric, (or a "free gift" blanket like this one) you will need 2 yards of fleece. One yard of pattern fleece for the front, and one yard of solid matching fleece for the back.

  
(Don't forget to cut off the salvage edge!)
Also, make sure you wash and dry the fabric before you start so that they're pre-shrunk.


I got one yard of fleece for the back and had to measure the front fleece and cut the back fleece to match the measurements.


Then I laid the front and back together on a clean surface. Make sure you place the outsides out.


As you can see in the photos above I cut notches in the four corners of the blanket. Measure a five inch square in the corners and cut it out. This will help to form the corners of the blanket once you start to tie them together. 


 Next, start cutting the fringe along the sides of the blanket. Cut in five inches, using the corner notches as guidelines. Make each fringe about one inch wide.

   
It might take a while depending on how big your blanket is but once you are done with the fringe you are almost done!

 
 Start to tie the back and front pieces together in double knots. This also may take a while!


 Once you have tied all the fringe pieces together your blanket is done!


If you are giving this as a gift you can tie it together with the salvage edges you cut off earlier! It makes a very sweet looking present I think! 

I hope you enjoy making this for someone special in your life!


Friday, June 8, 2012

Week 7 - Pillow Case Skirt

Hi! I hope you all are having a nice week! I sure am. It's my first full week on the summer schedule and I love it! I have so much time to get things done around the house!

This week's project was a fun one! 

Yesterday I made a skirt out of a pillow case! I first saw this on pintrest a few months ago. I looked at all the different tutorials and decided to take this project into my own hands. I made my first pillow case skirt a while back for me to wear on Easter. It turned out okay and I got a lot of compliments, but I wasn't fully satisfied. I had an idea for how I could make it better. Hence today's post!

I didn't have any cute pillow cases that I wanted to cut up so I kept my eye open at yard sales. Last week I found 4 super cute/perfect-for-skirts pillow cases! 

What I learned from this project - I would say I learned how to sew with elastic, but I didn't really SEW with elastic, so I'll just say I learned how to work with elastic.

Note: Making this skirt the way I do in this post unfortunately only applies if you have a very small stature, (like me). Otherwise you can make it for your favorite 10 - 12 year old. Ha!


Cute huh?


First, gather your supplies. (Pillow case, matching thread, elastic measured to fit your natural waist)


 Measure from your natural waist to where you want the skirt to fall. This totally depends on how tall you are and how long you want your skirt to be. I wanted mine to fall mid-thigh.


Turn the pillow case inside out and mark where you just measured. 


Cut where you just marked.


Depending on how wide your elastic is, (mine was 3/4 inch) pin down enough fabric to feed the elastic through. Don't forget your seem allowance! I pinned down 2 inches. Always remember to start pinning along the existing seem so that everything lines up.


 Finish pinning all the way around.


 Start sewing where you pinned with about 1/4 inch seem allowance. Sew all the way around the waistband.
 

You can barely see it in this photo but I double stitched around the whole skirt as well. Just to make sure it wouldn't fray.


This photo better shows the double seem.


At this point in the sewing I realized I totally forgot to leave an opening to feed the elastic through! Ha! So I did a little seem ripping right along the existing seem and started feeding it through with a safety pin pinned to the end to help get it through.


Once the elastic is fed through the waistband, overlap the 2 ends of elastic and sew up the opening, sewing the elastic along with it to secure it. I sewed over it a couple times just to make sure it would hold.


 And you're done! Here it is from the back and front again. I really enjoyed making this skirt and plan on wearing it a lot this summer!


I hope you enjoy making yours!